

The definitive guide to using Docker as a local development environment (part 1)
EDIT: If you prefer slides, I animated a workshop on this topic at Capitole du Libre on Novembre 19th 2017 and the slides are available there: https://gitpitch.com/augnustin/docker-local-tutorial
I work as a freelancer. It means I keep switching between projects, sometimes several times a day.
My first project uses Ruby 2.1 with Rails 4.2. But it also relies on NodeJS through the RubyRacer gem, which is only compatible with NodeJS < version 4. But my second project is a Node one, based on the latest express version, with Node 8. When I want to edit my portfolio I use Jekyll which requires Ruby 2.2. Not to mention that PostgreSQL cannot be installed in multiple version on a single machine …

How to manage all those development environment?
Advised people might tell me there are tools like RVM, NVM, or that this might be an opportunity to update your projects to the last Rails version. And if it works with PostgreSQL 9.6 it shall work with 9.1…
Nope, those are not acceptable answers, especially in the micro-service era. Because Docker is here now. And I think you should use it too!
You will get:
- project-specific sandboxed environments, with their own dependencies installed without conflict
- an over-simplified dev environment setup process, perfect for teams: run
docker-compose buildand done, even if your architecture involves several services with multiple technologies and versions - removed windows/osx specific configs: all the code is written for linux environment
- a dev environment that has exactly the same dependencies as the production one
- some basic DevOps skills along the way
Let’s start a new project
The rest of the post assumes docker and docker-compose installed on your local machine.
Every new project starts with the following two files:
docker-compose.yml:
app:
  build: .
  volumes:
    - .:/app
  ports:
- '3000:3000'Dockerfile:
FROM ubuntu:latest

# Nothing more for now
Docker-compose is a docker utility that allows to store a docker config in a file, to have easier access to the commands. What is going on here? Simple:
app:: It will create a container calledappbuild: .: which will use the image built from theDockerfile(namely theubuntu/latestimage since it is still empty for now).volumes:- .:app: Once built, the inner-docker folder/appwill share its content with your local current folder.ports:- 3000:3000: Finally, when running it, the docker port 3000 will be mapped to yourlocalhost:3000port. If you are unsure of the ports you need to open for now, you’ll always be able to change those afterwards.
Before we continue, I added to my shell the following two aliases as a convenience:
alias docker-enter="docker-compose run --rm --service-ports app /bin/bash"
alias docker-enter-again="docker-compose run --rm app /bin/bash"
I encourage you to do the same! Don’t worry if you don’t understand those for now, I’ll come back to them later.
Inside the Matrix
Now what we want is to have a shell inside the container to work with it. Here are the commands:
$ docker-compose buildThis will build the container with the docker-compose.yml config. During the first execution, this step is optional since the container would have been built automatically if it didn’t exist.
$ docker-enter # aliased to `docker-compose run --rm --service-ports app /bin/bash`Here comes our first alias. The command /bin/bash gets executed in the app container. The --service-ports flag tells docker-compose to bind the ports 3000 to your localhost, the --rm does some cleaning on exit.
Great! You are inside.
Inside what? A brand new ubuntu machine free from any dependency. You can type whatever Unix command you know to get yourself comfortable:
$ pwd
/app

$ ls
Dockerfile docker-compose.yml

$ whoami
root
Now say your project is a NodeJS one. What’s next? Well, the usual: google install nodejs ubuntu and follow the steps:
In your docker terminal, type:
# you don't need the `sudo`s since inside a docker, you are `root`
apt-get update
apt-get install nodejs
apt-get install npm
Now create a file package.json file with this content:
{
"name": "docker-dev-demo",
"version": "1.0.0",
"dependencies": {
"express": "^4.15.3"
}
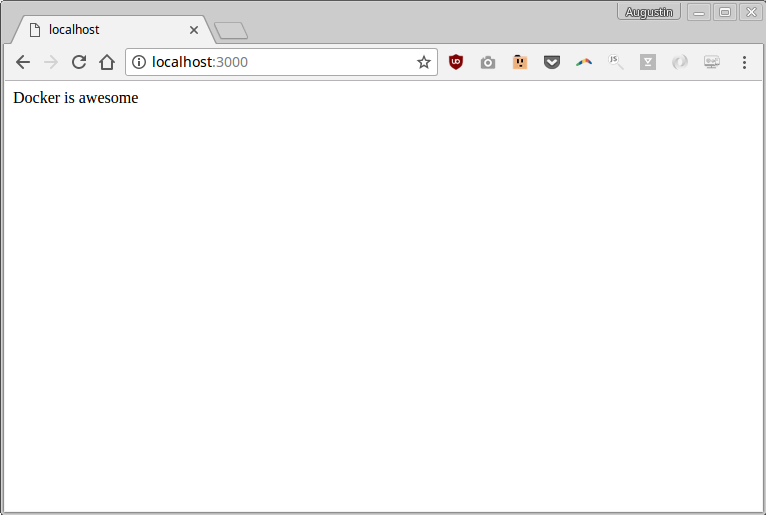
}And index.js (from express getting started):
const express = require('express')
const app = express()

app.get('/', function (req, res) {
  res.send('Docker is awesome')
})

app.listen(3000, function () {
  console.log('Example app listening on port 3000!')
})
Run npm install just like you know, then node index.js and finally visit http://localhost:3000… tadam!
Commiting changes
Are we done? Not quite. Indeed, if you try to exit the container (FYI by typing exit after Ctrl+c to stop the node server), and then type docker-enter again, you’ll have to redo all the steps above.
Disappointing, is it? Don’t worry, we have a solution to make those changes permanent. Once you are happy with the sequence of commands you typed, you simply need to report those to the Dockerfile.
The good thing about this is that if you ran some command that you finally don’t need (eg. npm install -g express), you don’t have to undo it to get a clean environment: simply don’t report it to the Dockerfile and it will be gone during next build.
If you use NodeJS, running commands in the docker is like running npm install <packagename>, while writing to the Dockerfile is like running npm install <packagename> --save: next time you run npm install the package will be present in the later case, but not in the former.
Here’s the new Dockerfile content:
FROM ubuntu:latest

RUN apt-get update
RUN apt-get install -y nodejs npm # this is an automated script, we want to avoid the apt confirmation

WORKDIR /app
ADD package.json . # At this step, the volume is not shared hence package.json is not in the container

RUN npm install
Since you have made changes on your Dockerfile, you need to rebuild your project:
$ docker-compose buildDocker-compose will encourage you to have a command entry in docker-compose.yml so we can add a line:
app:
  build: .
  command: node index.js # Added
  volumes:
    - .:/app
  ports:
    - '3000:3000'
This allows you to run docker-compose up to start your server immediately.
Feels convenient, but in practice I always prefer to use docker-enter instead and there to type node index.js since there might be other commands you might have to run inside the container at that time.
What’s next?
So far we have seen how to setup a dev environment without installing anything on your machine except Docker itself. This is the first step to reach the docker independence: fully dockerized environments.
In the next part, we’ll find out how to setup a database along with some automated scripts.
Read Further
")
The definitive guide to using Docker as a local development environment (part 2)

Learn how to plug a DB to your Dockerized server
Continue →
The day I stopped using Heroku
Heroku has been a great service, but also has too much control on my work.
Continue →